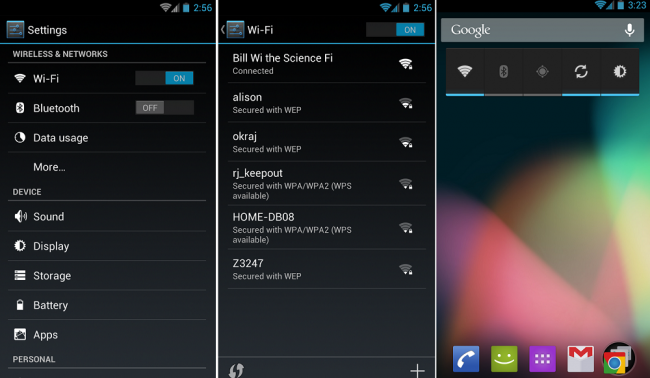
You just got your new Android smartphone home and are ready to connect to your home network, but how do you do it? It’s pretty simple really and can be accomplished with the touch of a few buttons.
Standard Method:
1. First, head into the Settings menu of your device.
*Press the Menu button and then Settings. On some devices without a Menu button, you can pull down your Notification menu and select the Settings icon.
2. From there, the top option you will see under “Wireless & Networks” is Wi-Fi.
3. Select Wi-Fi and turn the toggle or button to “On.”
4. The device will display all of the networks in range.
5. When you see your home network’s name, select it, enter your password and hit “Connect.”
6. You are now connected to a Wi-Fi network.
Alternative Methods:
For future usage, Android comes with a Power Control widget that can be placed on a homescreen and is a much quicker method for toggling Wi-Fi on and off. To add the widget, long-press the desired homescreen and an options menu will appear. Select “Widgets” and scroll down the list until you see “Power Control.” You have now added the Power Control widget to your homescreen.
If your device is running Ice Cream Sandwich or Jelly Bean, the widgets menu can be accessed by opening your app drawer and scrolling all the way to the right or hitting “Widgets.” By hitting the Wi-Fi icon on the Power Control widget, it will toggle your Wi-Fi connection on and off without forcing you to go into the Settings menu.
On some devices, the Power Control is accessible through the pulldown notification bar on the top of your display.
*Android Beginners Guide is a way for people new to Android to get to learn how Android works. We will be posting many tips and tricks on how to optimize your usage of the Android operating system.


Collapse Show Comments100 Comments