We may be just days away from the release of the Galaxy Nexus on Verizon, and I’m sure that many are starting to think about this whole bootloader unlocking process. As a Nexus device, the bootloader does not have to be bypassed or hacked like you have probably had to do to your last couple of phones. It’s a developer device that is made to be open. You can unlock your G-Nex within a couple of minutes as long as you have all of the right tools in place.
To get you prepared, we have put together a set of instructions that should cover the whole process. The big trick here is to get the Android SDK installed and to have it recognize your device through adb. Once you have done that, you should be able to unlock your phone with 2 simple commands and a quick volume press on the device.
And we are telling you about this now, because unlocking the bootloader of your Nexus should be step 1 before you get into customizing it to your like, downloading your favorite apps, etc. Unlocking the bootloader wipes your phone clean, so you will want to take care of this step from the get-go instead of having to start over on your phone down the road. Once your phone is unlocked, you won’t have to worry about unlocking it ever again.
So your homework until the phone arrives, is to check out the first 7 steps that we have below to get your Windows computer all set up for adb through the SDK. If you can get your phone to reboot to the bootloader by typing “adb reboot bootloader” then you should be all set. Your current Android phone should work just fine in getting this all set up.
Ready?
Instructions:
*Windows only.
*You will need to install this Samsung driver.
*If that driver does not work, you may want to try this one.
1. Most important piece to this, is getting the Android SDK set up properly. [Instructions]
This can be one of the most difficult things to get set up, however, you cannot go forward without the SDK and adb set up and working. The instructions we linked should get you setup. Once the SDK is installed, you can move on to step 2.
2. Place a fastboot.exe file in your SDK/Tools (or Platform-Tools) folder (same as your adb.exe file) if it is not there already. [Download]
*You may also need to move AdbWinApi.dll into the same folder as your adb.exe and fastboot.exe if you are running into issues. I believe in the latest SDK, that everything defaults to SDK/Platform-Tools rather than SDK/Tools. Just depends on the version you are using. The big thing, is to get adb.exe, fastboot.exe, and AdbWinApi.dll into the same folder.
3. On your device, turn USB Debugging on.
Settings>Developer options>USB debugging
4. Plug your phone into your computer.
5. On your computer, head into your SDK/Tools folder or wherever your adb.exe and fastboot.exe files are.
6. Hold SHIFT and right click – choose “Open command window here.”
7. Type the following command:
adb reboot bootloader
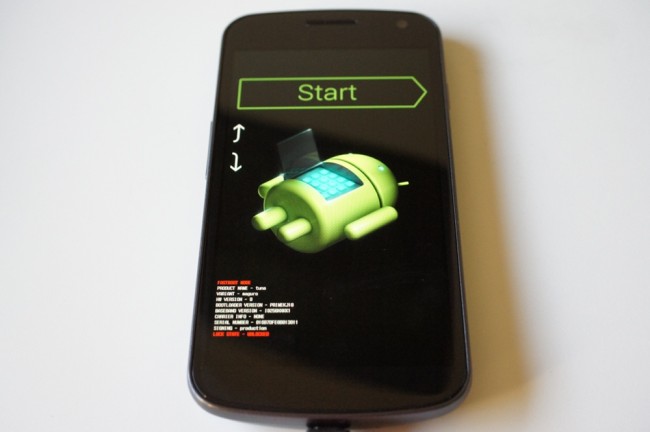
8. Your phone will turn off and reboot to the bootloader.
9. Type the following command:
fastboot oem unlock
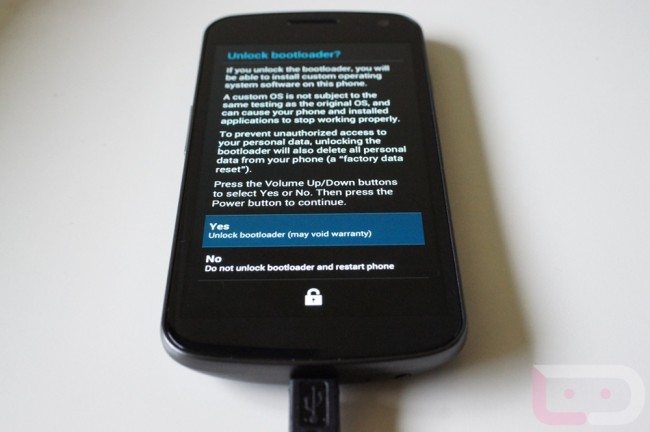
10. Your phone will then ask if you want to unlock.
11. Using the volume keys, highlight “Yes” and then press the power button to select it.
12. Your bootloader will now be unlocked.
13. Choose to start your phone and it will factory reset itself and reboot.
*During reboot, DO NOT BATTERY PULL. The phone may loop and loop, but battery pulling will soft brick you and you will have to flash factory images to reset yourself. I was able to unplug from the computer while it was looping and the phone then rebooted itself. Or you may just have to wait a while since it is factory reseting during this first boot.
14. You are now operating with an unlocked Galaxy Nexus.
Quick video instructions:
Tips:
-We know that many of you are running into a “waiting for device” issue when apply the fastboot oem unlock command. This is a driver issue and one that a reader has a suggestion for:
1. Open device manager on your PC.
2. Right click on Android 1.0 with the yellow ! mark on it.
3. Choose update driver.
4. Choose browse my computer.
5. Choose Let me pick from a list.
6. Scroll down and find the Samsung driver with newest date. Should be the driver you downloaded above. (Possibly dated 11/25/2011 ).
7. It will give you a warning about installing the driver, just click yes.
Alternate USB driver:
-And if that driver still does not work, try this one. [Download]
Questions:
–Can I still receive OTA updates after unlocking the bootloader?
–Answer: Yes. Your phone really does not change at all when you unlock the bootloader. You will still receive updates from Google. Now, if you start putting on custom recoveries and rooting, you may run into issues with receiving OTA updates. The good news is that Google usually releases the system image files for their Nexus phones which makes it a breeze to go back to stock for updates.
_____________________________________
If you run into issues along the way, be sure to drop them in the comments and we will all do our best to help you get through them. The SDK portion will be the most difficult, but there are countless resources out there to get you fully up and working in that department. Once the SDK is ready to go, this really only takes about 5 minutes.


Collapse Show Comments537 Comments